Welcome to my very first post at ITSqueeze.com I've been think about starting my own IT related blog for a long time now, as both a place to categories useful tools/code snippets I come across in a central location while sharing them with others.
I hope to turn ITSqueeze into a hub for providing developers and IT professionals with tools and tips to become highly efficient, while discussing and simpling complex topics.
Sikuli
I came across a tools a few weeks ago the has the potential to eliminate all those annoying repetitive tasks. An even more exciting prospect is that it proves a way to replicate setting up development environments across developer workstations. No more setup instructions that never get updated, Sikuli is so easy to use even non developers are using it to automate GUI interactions.
With a Linux, Windows, and Mac version available Sikuli is a GUI scripting tool developed by the User Interface Design Group at MIT. The idea of automating GUI actions is nothing new, Visual Basic, and even Java via the Swing Robot have been able to automate GUI actions for years. However, the way in which Sikuli goes about implementing this is truly unique. Rather than having to manually code in screen locations, and hoping GUI components will still be located in that location when the script is run, Sikuli embeds screen captures right into the script via the IDE, then matches these captured images with the screen when the script is run. This is an elegant solution to the problem of knowing when actions should be performed on the GUI and has the fantastic side effect of making coding GUI automation much easier.

Sikuli's scripting language
The scripting language used in Sikuli is actually just an extension of Jython (the Java VM implementation of Python) , which means you have the full power of Jython and the Java VM at your disposal. There are also a number of methods provided by Sikuli itself that provide the core for developing scripts. The best way to demonstrate just how easy GUI automation with Sikuli is, is to provide an example. So lets step through the creation of a simple script to get you started.
Download and install Sikuli
The current version of Sikuli works on Linux, Windows and Mac and can be downloaded here.
Run Sikuli and create a simple script
Once you have Sikuli up and running we can begin to create our simple script. For this example we will be automating some browser interaction, but remember as Sikuli uses captured images as its way to observe your screen you can automate anything you can think from running native apps, to updating you facebook status. One thing to be aware of when automating web apps is you should always use the same browser as browsers can display different fonts and Sikuli might not recognize your screen captures across browsers, the best way to do this is open a fresh browser from Sikuli at the start of your script as we will do in this example.
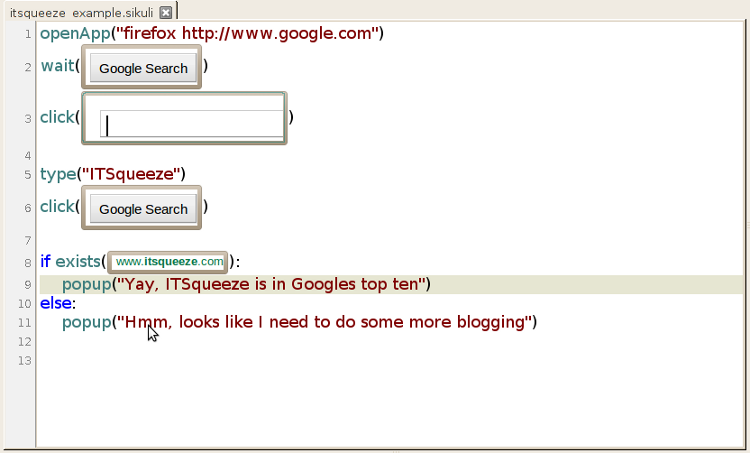
1. Open firefox
To open some common application Sikuli provides the openApp() method. In our example we use it to open firefox (mac users should be able to use safari instead), note that we also pass and an argument "http://www.google.com" this tells firefox to open the url to Google.
2. Wait for Google to load
Web pages as well as native applications, can take time to load therefore Sikuli provides a handy wait() method that takes in a screen capture as an argument, so that you can wait for a page to load before trying to type something or click on another link. The Sikuli IDE provides you with multiple options for entering the screen capture as an argument, the easiest way is to use the wait button from the ide ![]() this will automatically add the wait() to your code, minimise the Sikuli IDE then allow you to capture the screen image you want. You can also manually type in wait() and either use the shortcut PC <ctrl-shift-2>, Mac <Command-shift-2>
this will automatically add the wait() to your code, minimise the Sikuli IDE then allow you to capture the screen image you want. You can also manually type in wait() and either use the shortcut PC <ctrl-shift-2>, Mac <Command-shift-2>
or click ![]() to capture a screen image.
to capture a screen image.
In our example we capture the Google submit button as once this has loaded it should be safe to continue with our script.
3. Selecting the Google search text box
The Google search text box will usually be selected by default when you load the page however, selecting parts of the screen is an important aspect of Sikuli scripts so in this example we will be using Sikuli to select the text box so you can see how it works. First select the text box using the ![]() button. As its name suggests this method takes over your mouse and clicks the matching screen capture. Something to be aware of is by default this will click on the center of the screen capture, however in many cases this might not be where you want to click, luckily this can be offset to somewhere else in your screen capture. To set the click offset you simply click on the screen capture
button. As its name suggests this method takes over your mouse and clicks the matching screen capture. Something to be aware of is by default this will click on the center of the screen capture, however in many cases this might not be where you want to click, luckily this can be offset to somewhere else in your screen capture. To set the click offset you simply click on the screen capture  this will cause the Pattern Settings dialog to pop-up, select the target offset tab.
  From this tab you can simply move the cross-hair to where on the screen capture you would like to click, then click ok. Now you should see a red cross-hair on the screen capture that shows were the offset is located, this is where the click action will be performed.
4. Typing Text
The type() method is quite simple and does as the name suggests type texts as if you we pressing the keyboard. For our example we provide "ITSqueeze" as the text to be typed. You may have noticed on the IDE there are actually two type() methods, the one we used and one taking a screen capture as an argument, when providing a screen capture the type() method simply combines click() and type() so in our example we could replace these two lines with one line (see below). 
5. Click Google Search
Again we use click to preform the Google search.
6. Does screen capture exist, pop-up result
A very useful method provides by Sikuli is the exists() method. Based on the screen capture used as an argument exists() returns true or false based on whether it can find the capture on the current screen. This is useful for creating conditional branches such as the if statement in our example. Here we use the popup() method provided by Sikuli to provide the user with the outcome of the script.
7. Reviewing our example
One thing to remember when writing Sikuli scripts is that GUI scripting is prone to failure if you don't account for dynamic events, such as slow loading web pages/application, buttons/text that you are expecting but might not be in view, your script may not alway work as you expect.
Q. Can you see any errors with the example script???
A. When the Google search is clicked, there is no wait, or sleep called (in case page is slow loading) before we call exists(). Therefore www.itsqueeze.com might be viewable to you after you run the script but the popup message "Hmm, looks like I need to do some more blogging" is returned because when Sikuli checked for the image Google was still loading.
The second error with the example script is that unless you have a large computer monitor that you can see all 10 Google search results in, you would get the message "Hmm, looks like I need to do some more blogging" if ITSqueeze were at bottom of the search results rather than the top. The solution to this is to use the type() method with the argument Key.DOWN and loop through until you have check all top 10 search results. (See below for example)

I prefer using type(Key.DOWN) over clicking the scroll button as it is a more generic way of scrolling with Sikuli and can be used across application, and operating sytems when the scroll buttons image would differ.
I hope my introduction to Sikuli has been useful, please feel free to email me any question about this article you may have, and look out for future more advanced articals on Sikuli.
I just loved the way u gave the brief introduction about the sikuli scripting language. Can u provide some more articles regarding this automation tool. I am basically an intern in a company as of now and my mentor has asked to work out with this tool. Of all the sites which i visited related to sikuli this is probably the finest and the best one for a begginer. I would be looking forward for some more articles regarding sikuli from your side.
Please mail me and keep me updated. Thanks in advance. Vibhore Agarwal
What would you like me to add? Is there anything in particular you want to know?
Can you explain how the jython script can be modified ?
Thanks for the tutorial. I couldn't get the openApp part to work, but I found this page:
https://bugs.launchpad.net/sikuli/+bug/701477
However, you need to find your specific location of the firefox app. For example, a simple piece of code to open firefox on my laptop is:
openApp("C:\\Program Files (x86)\\Mozilla Firefox\\firefox.exe")
Very well explained . Really helps a lot for learning purpose.